 by
by Learning how to reduce audio noise in capcut desktop for free is important for creators who want clean and professional sound without paying for extra tools. CapCut already gives you simple editing options inside its CapCut noise reduction tool, which helps remove distracting background sound quickly.
You can also use CapCut CapCut audio editing features to improve clarity and boost voice quality while keeping the original tone natural. With the right adjustments, improve audio quality in CapCut, audio noise cancellation in video, and clear voice in video editing become easy goals for beginners. This guide explains how to reduce audio noise in capcut desktop for free step by step today easily
Why CapCut Desktop Works for Free Audio Cleanup
CapCut’s official pages say its tools can remove background noise from audio and improve clarity with a few steps. The platform also keeps the workflow simple because you can separate audio, reduce noise, and export from one editor. That is useful when you want a background noise removal app or video audio cleanup tools that do not add another subscription to your month.
For desktop users, the biggest win is speed. CapCut’s audio panel includes noise reduction controls, and its help center documents export options for clean playback. So when people search for CapCut desktop noise reduction, CapCut audio editing features, or clear voice in video editing, the desktop workflow is designed to give a fast answer.
How to Reduce Audio Noise in CapCut Desktop for Free

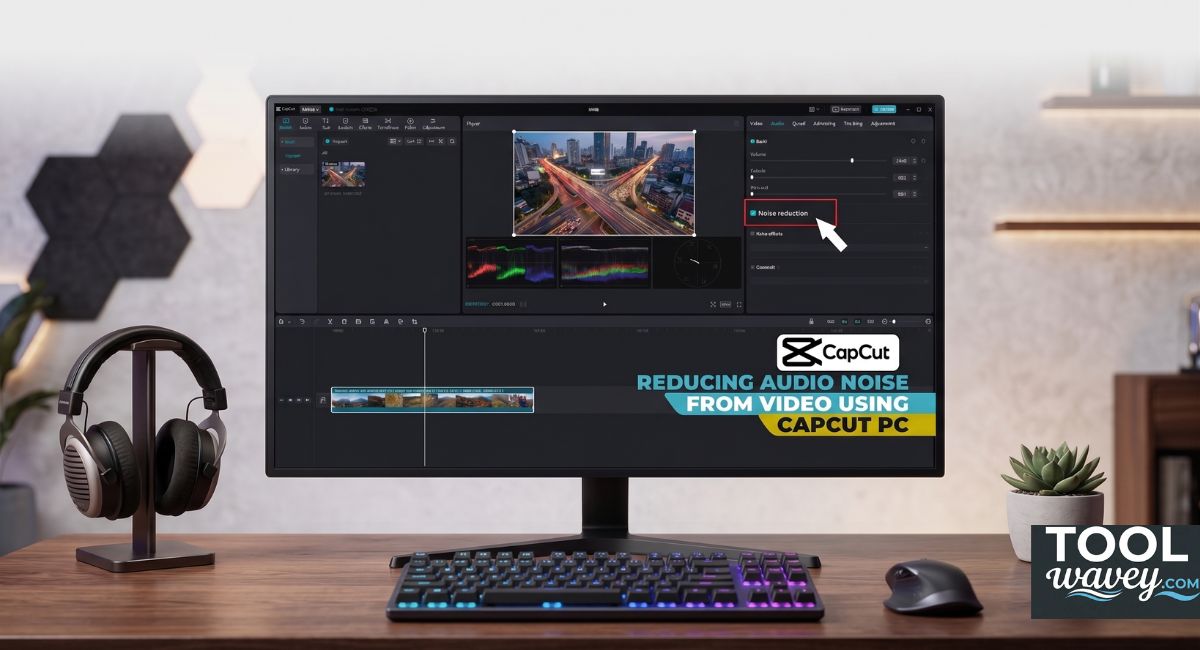
Start with your clip. CapCut’s guides show that you can import the video into a new project and then separate the audio with Extract audio when needed. After that, select the clip, open the Audio area, and switch on Reduce noise or Noise Reduction. CapCut says you can then adjust the intensity so the sound matches the level of noise in your file.
| Step | What you do | Why it helps |
| Import | Add your video to a new CapCut project | This gives you a clean starting point |
| Separate audio | Use Extract audio if needed | It makes the sound easier to edit |
| Reduce noise | Turn on Noise Reduction | It cuts down hiss, hum, and room noise |
| Preview | Listen before exporting | It helps you avoid harsh or robotic sound |
After the first pass, listen again with headphones. If the room tone drops but the voice still sounds natural, you are close. If the voice starts to sound thin, lower the strength and try again. That is the safest way to remove background noise in CapCut while keeping the speaker sound human and easy to understand.
Choosing the right strength
The best setting depends on the noise. Light works well for soft hum. Medium fits normal chatter or fan noise. Strong is for heavier problems like traffic or construction. CapCut’s own noise-reduction guidance says you can adjust intensity as needed and even combine it with slight equalization for louder noise. That is why CapCut noise reduction strong vs medium vs light settings matters so much.
| Setting | Best for | Watch out for |
| Light | Soft air noise or mild hiss | May leave some noise behind |
| Medium | Everyday room noise | Can sound over-processed if pushed too far |
| Strong | Loud wind or traffic | May affect voice tone if overused |
How to Make Voice Clearer After Noise Removal

Once the noise drops, the voice still may need a little polish. CapCut’s voice-enhancer and audio-filter pages say you can improve clarity, normalize loudness, and remove background noise with AI-powered audio tools. That is where enhance voice clarity in CapCut, CapCut sound enhancement settings, and best settings for CapCut audio clarity become useful ideas instead of vague advice.
A smart next move is to refine the tone without overdoing it. CapCut’s guidance also mentions that for strong noise you can pair noise reduction with a little equalization and reduce the high frequencies where hiss often lives. That helps you how to make voice clearer in CapCut and how to improve audio quality in CapCut PC without making the speaker sound metallic or hollow.
A simple rule for cleaner speech
Think of the voice like a photo. You want it sharp, not overfiltered. If the audio gets too bright or too thin, pull the settings back a little. That is the real secret behind CapCut equalizer settings, CapCut audio settings tutorial, and how to edit audio like a pro in CapCut. The best edit usually sounds natural, not flashy.
How to Fix Bad Audio in CapCut When It Sounds Distorted

how to reduce audio noise in capcut desktop for free
Sometimes the first noise pass goes too far. That is why people ask why does my audio sound distorted after noise reduction and how to fix distorted audio after noise reduction in CapCut. The fix is usually simple. Lower the noise-reduction strength, use a small amount of equalization, and preview the clip again before you export. CapCut’s own 2026 guidance says to adjust intensity and combine it with slight EQ when noise is very loud.
This is also where you should avoid guessing. If the clip sounds robotic, do not stack every audio effect on top of each other. Keep the changes small. That is the easiest way to how to fix bad audio in CapCut, how to reduce echo in CapCut video, and how to clean up voice recording in CapCut without damaging the original voice.
How to Improve Audio Before Export
Clean results start before you hit export. CapCut’s tools work best when the source audio is not too messy. If you can, record in a quiet room and keep the microphone closer to the speaker. That helps with improve microphone audio quality, how to improve microphone sound in CapCut videos, and video editing sound improvement tips before editing even starts. This advice is simple, but it saves time later.
A good workflow is to clean the clip, preview it on headphones, and then decide if it needs a second pass. That is especially helpful for creators who make short-form content and want how to make my video sound professional in CapCut or how to reduce background noise in video without losing the natural feel of the speaker. When the source is clean, CapCut has much less to fix.
A Quick Case Study
Imagine a creator filming a 30-second YouTube Short in a room with a fan running. The first edit sounds rough because the fan sits under the voice the whole time. After using how to reduce audio noise in CapCut desktop for free, the creator turns on noise reduction, lowers the strength until the voice sounds natural, and adds a tiny bit of voice enhancement. The final clip feels smoother and easier to watch.
Now imagine the same clip with overdone settings. The fan disappears, but the speaker sounds like they are talking through a tin can. That is the wrong balance. The better move is to keep the edit subtle, use the CapCut noise reduction tool carefully, and stop as soon as the voice sounds clear. That is the difference between a cleanup and a disaster.
Best Export Settings for Clean Sound

Export matters more than many beginners think. CapCut’s help center says that when audio is missing after publishing, you should use MP4, enable Export audio, and choose the AAC codec with a 44.1 kHz or 48 kHz sample rate. Those settings help protect your sound on the way out and make how to export clean audio from CapCut much easier to get right.
| Export choice | Recommended option | Why it helps |
| Format | MP4 | Broad compatibility |
| Audio | Export audio on | Keeps the sound attached |
| Codec | AAC | Standard and reliable |
| Sample rate | 44.1 kHz or 48 kHz | Helps preserve voice quality |
Once the export is done, test the file on your computer before uploading it anywhere else. That one extra check can save you from re-editing a whole project later. It also supports best CapCut audio settings for removing background noise and helps you how to make professional audio quality in CapCut video with less stress. How to Auto Caption Videos in CapCut Desktop for Free: A Complete CapCut PC Tutorial
FAQ
How do you reduce noise in CapCut audio?
You can reduce noise by importing your video, selecting the audio track, and turning on CapCut’s Noise Reduction tool. Adjust the strength until the voice sounds clear and natural without distortion.
Can I remove background noise for free?
Yes, CapCut allows you to remove background noise for free using its built-in audio noise reduction feature. It works directly inside the editor without needing paid software.
How to reduce noise in audio?
You reduce noise by isolating the audio, applying noise reduction, and fine-tuning the settings for a clean but natural voice. Always preview to avoid over-processing the sound.
How to denoise a video for free?
You can denoise a video for free using tools like CapCut or other free editors that include audio cleanup features. Simply apply noise reduction and export the improved version.
How to clean audio in Final Cut Pro?
In Final Cut Pro, you clean audio by using built-in effects like Voice Isolation and Equalization tools. These help reduce unwanted noise and enhance speech clarity.
Does Final Cut Pro have audio noise reduction?
Yes, Final Cut Pro includes audio noise reduction and voice enhancement tools. You can remove background noise and improve dialogue quality using its audio effects panel.
Final Thoughts
If you want a free and simple fix, how to reduce audio noise in CapCut desktop for free is one of the easiest editing skills to learn. CapCut gives you a noise-reduction workflow, audio separation, voice enhancement, and export control in one place. That is enough for most short-form creators who want clearer sound fast.
The best result is usually the natural one. Clean the noise. Soften the harsh edges. Keep the voice honest. That is the real goal behind how to reduce audio noise in CapCut desktop for free, how to fix low quality audio in CapCut, and how to make your video sound professional in CapCut. When you stop before the audio feels over-processed, your viewers notice the message first, not the mess behind it.